Etikett: My favorite Things (MFT)

Gymnastikpåse och kulpåse

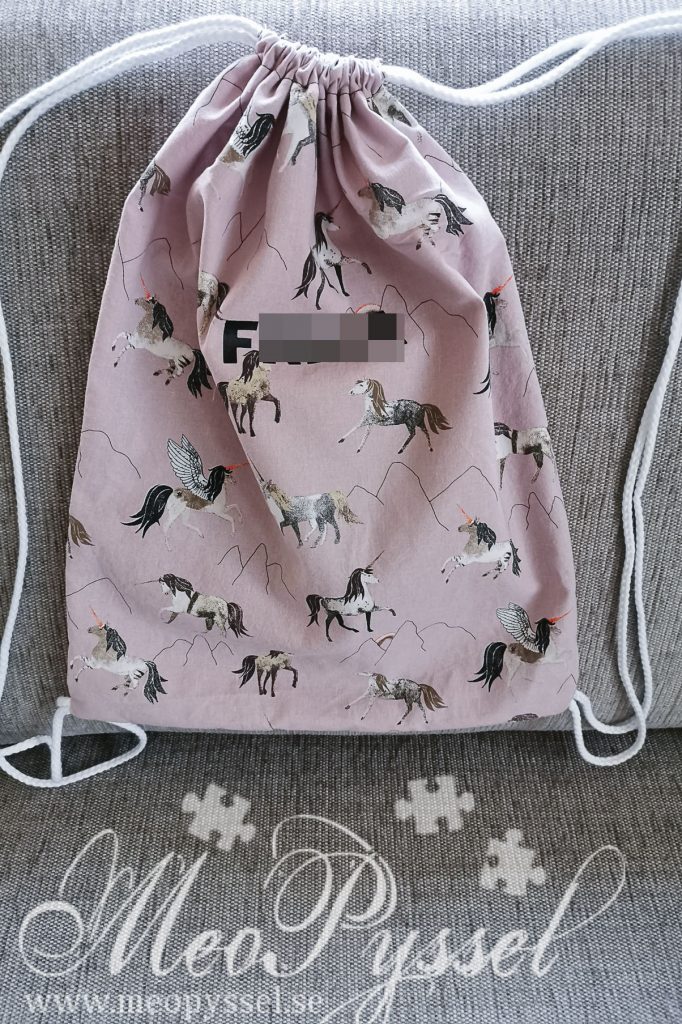
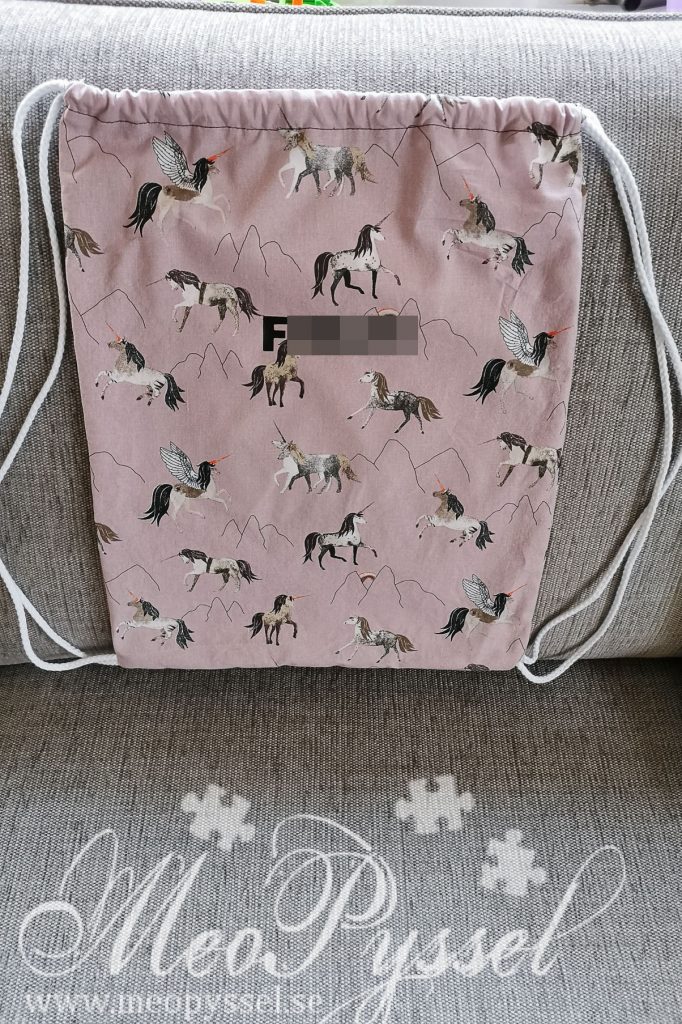
Stora har börjat i förskoleklass nu efter sommaren och det medför en massa nya spännande saker. Bland annat har hon nu gymnastik i idrottshallen på skolan och även om de inte byter om så vill hon ha en gymnastikpåse till sina inneskor.

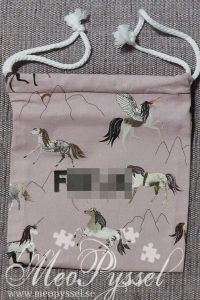
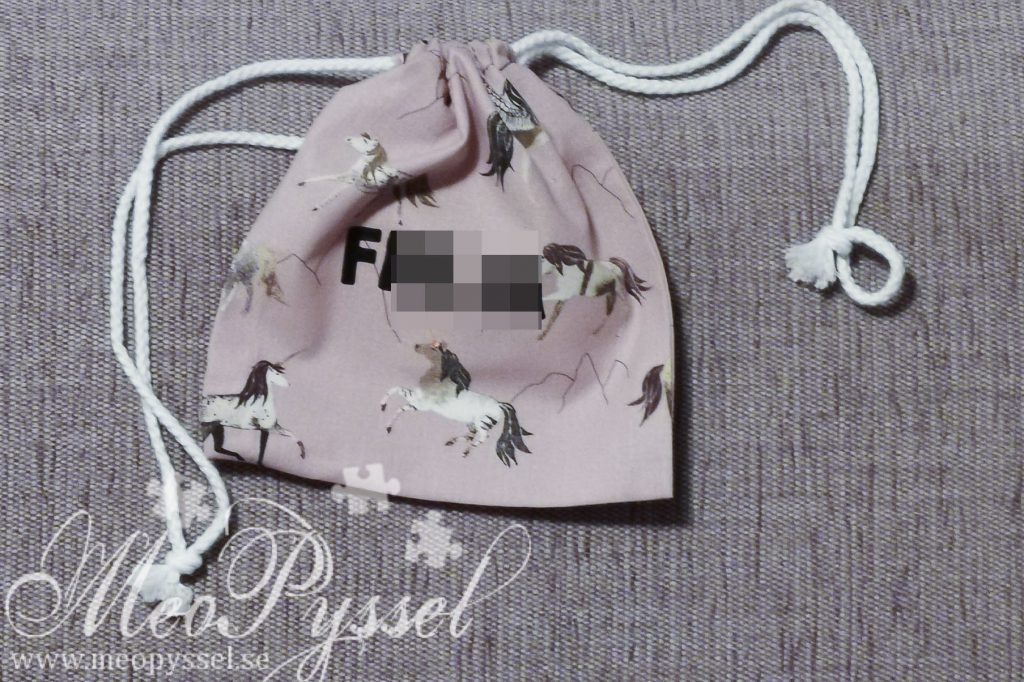
Jag gick och letade efter ett tyg som skulle kännas lite mer som en gympapåse så som jag kom ihåg dom, lite plastig och/eller med nylon men jag hittade inget på Stoff och Stil. Jag valde därför att ta ett vanligt vävt bomullstyg med ett mönster som jag tror hon skulle gilla. Jag hittade ett lila med enhörningar så det kändes som en fullträff. För att slippa tänka och låta det gå så snabbt som möjligt plockade jag också upp Stoff och stils mönster på Gymnastikpåse, fruktpåse och pennskrin.

Jag sydde gymnastikpåsen efter mönstret men jag måste säga att jag tyckte att instruktionen och bilderna var ganska luddiga, det är tur att jag sytt förut annars hade det blivit svårt. Gymnastikpåsen har måtten 34 x 43cm. När den var klar tyckte jag att den såg lite tom ut så jag valde att stansa ut bokstäver i textil transfer med mina My Favorite Things´ (MFT) By the letters uppercase-dies så att Storas namn står på påsen.

En annan ny sak på skolan är att många spelar kula på rasten och det är något hon aldrig sett eller varit med om. Vi har haft lite spelkulor hemma (har ingen aning om hur eller varför) så hon ville så klart ta med sig det till skolan. Skolan har regeln att man får ha med sig 10 kulor så jag bestämde mig för att göra en ganska liten kulpåse med samma typ av dragsnöre som gymnastikpåsen.

Jag valde storleken efter en liten remsa som blev kvar efter jag klippt ut gymnastikpåsen, därför är fram sidan rättvänd medan mönstret på baksidan är upp och ner. Den är ca 15 x 20cm och här använde jag inget mönster utan sydde en påse med kanal som jag sedan trädde på samma sätt som gymnastikpåsen men istället för att fästa ändarna i botten så knöt jag hop dom. Eftersom den här påsen var så mycket mindre fick inte samma bokstäver plats som på gymnastikpåsen så här använde jag istället Lawn Fawns die-set Coles ABC.

Mönster:

Tyg:

  • Vävt bomullstyg

Övrigt:

  • Stoff och Stil – Textiltransfer svart
  • My Favorite Things – By the letters uppercase
  • Lawn Fawn – Cole´s ABC

Träffar: 835

Målade T-shirts

Eftersom den förra t-shirten blev så bra lovade jag Stora att hon också skulle få göra en så när tillfälle gavs så tog Stora, Mellan och jag och smet iväg från resten av familjen och pysslade lite.

Mellan valde en schablon med glasar från Panduro men Stora ville inte ha någon av schablonerna som jag hade hemma. Så vi gjorde lite egna med hjälp av post-it-papper som jag har i gömmorna. Vi stansade ut fjärilar och hjärtan som vi sedan fäste på tröjan medan vi målade.

Stora blev lika nöjd som Mellan så jag tror det kommer att bli fler tröjor i framtiden.

Palett – textilfärg – Limegrön, Vårgrön, Mörkrosa, Ljusblå

Panduro Glasstencil

Post-it-papper

Dies: Neastabilites – Spellbinders – hearts. My Favorite Things (MFT) – butterfly

Träffar: 101

My Project Life Planner

So I made my own planning-sheet a while back were i could note information for the week and select a layout and photos. For 2015 it bound it together with some string so i could keep my active weeks together with my empty weeks. When I do my planning I also have my reference-sheet with Becky Higgings pocket pages (I only use Beckys for a uniform feeling in my albums) and sometimes a calendar so I can see which dates that goes in which week.

So now I have been thinking about making it a bit more sturdy and nicer. I borrowed a bind-it-all from a friend and yesterday I finally got the time to do it.

I made a very simple cover from laminated cardstock and a patterned paper (the back is identical without the text). The covers are about 0,5cm taller then all the other pages. The front is decorated with Bo Bunny’s Peacock Lane that is cut with nestabilities.
2016-01-25 Pl planerare 1The next full page spread after the cover is the pocket pages reference. On this one I will make some kind of a sticker (green, yellow and red perhaps) so I can know how many of the designs I have at home. I just hate to start a planned week and realizing that I don’t have the pocket-page I need. The reference is also laminated so it can be well-handled.

kOn the back on the reference I stuck to calendars of 201 and 2016.

2016-01-25 Pl planerare 2After the reference/calendar I added my old pages for 2015. They look a bit scruffy due to all the holes but they will soon be torn out (hopefully) anyway. And I don’t have a working printer home so I didn’t wanna redo them. The old pages are double-sided so they wouldn’t take up so much space.

2016-01-25 Pl planerare 5After my old pages I put in the new pages for 2016. I made a small change (made a divided note-space for my (now) two kids. These pages are unfortunate not double-sided (didn’t get a printer that could do that).

jbhjkhThe book is put together with a 1/2″ red wire from Zutter. It’s full but you can still turn the pages with ease, and it will be thinner and thinner for every week I put into my album…

material

  • Zutter – Bind-it-all, 1/2″ red wire
  • Spellbinders-nestabilities – labels 8
  • My favorite things – By the numbers

Träffar: 128

Week 1 of 2014

2014-07-17So I have now done my first weekly spread for Project Life. Fortunately for me it was a week when not much was going one so I just choose some photos I liked and could journal generally about what was going on at that time.

I have used the Becky Higgins core kit Turquoise, a free calender that I cut up and some Jillibean Soup stickers alphabet. I decorated by using a flag-punch from Stampin’ Up and I don’t know the name (I borrowed it from a friend). The flags is colored with Rhubarb Stalk Memento Ink and then i just drew a heart with a white pen. The hearts I used for decorations is Simon says Stamp’s Mini heart set, in white and Rhubarb Stalk. The arrows are stamps from MFT’s Right This Way

Träffar: 388

Welcome litte one

2013-06-08

So before I get to the card I have some more happy news. A couple a weeks ago me and Bjön bought a new apartment that is just amazing. Sadly I was the home of an old woman that past away but that mean that we will be able to move in a the end at the month. So not surprisingly we are now franticly packing all our belongings and the next thing will be my crafting-desk and stuff so I won’t be back (I think) with anything until the midst or end of July I think. Me and baby is still fine and just after the move we have the ultrasound so lots of updates for then:)

CMS-SKISSSo… I started this card like two weeks ago and It was meant for a work-friend of mine that just got a baby boy but I never did finish it in time. We’ll see who will receive it instead.

The card is made based on the current challenge-sketch over at Copic Marker Sverige (Sweden). But sense I’m such a slowpoke the challenge is closed but i wanted to share it with you all anyway.

I just love that Sweden have it’s own page now and I just love the challenges so far. As you can see i justed a sweet Lili of the Valley stamp and I tried to make it a bit more fun with a dotted background. I really like how the bear and background turned out but I’m still having problems with the front of the box, I should really practice if more but I just get annoyed and bored:P

material

Stamp: Lili of the Valley – Little Lorry Bear. The Craft’s Meow – Owl be thinking of you

Copic: B21, B02, B00, B000, N5, N3, N1, 0, Y15, Y11, E40, E41, E42, W3, W1, W00, B23, B21, B91, B000, 0

Paper: Doodlebug – Snips and Snails

Dies: Spellbinders – Nestabilities – Rectangle, Scalloped Rectangle. My Favorite Things – Stacking Stars

Other: Stampin’ Up – Ribbon. Glossy Accent.

Challenges

Träffar: 73

An remake of an old card

2013-02-17, 1So this weekend i have spent mostly redoing an old card I was unhappy with. I made the card about 6 month ago and i just felt that it was to cold, strict and empty so I finally sat down and made something with it.

I tore of the image so I could manage the background a bit better. I added a doily to give a bit of a softer look and then the green centerpice so avoid the emptiness. The sentiment if from another House Mouse set. I reattached the velvet ribbon and then added the black pearls instead of the black brads I had before.

Here comes a smaller before and after shot. The colors look a bit different and the true image is somewhere in between.DSCN4300

Before

2013-02-17, 1

After

material

Stamp: House Mouse – Mice and Crafty – Sew Mice, Birthday – Ice cream

Paper: My Mind’s Eye – On the Bright side 2

Copic: E11, E13, E21, N1, N3, N5, N7, B0000, C0, C2, C4, E50, E53, E57, 0

Dies/Punches: Spellbinders – Nestabilities – Labels 8. My Favorite Things – Jumbo Scallops. EK Success – Medium corner rounder

Other: Paper doily

Challenges

Träffar: 402

Happy Dinosaurs

2013-02-10, 1

(another picture with my phone- I have to get a new camera)

So This weekend I have been working on a card for my godson Gabriel’s first birthday. The card is OK but I’m not thrilled- but it have been a joy sitting and crafting for hours:)2013-02-10, 3

I have wanted to use this stamp from The Greeting farm for a long time and It’s just perfect for a little boy. It’s colored with copics as usual but both dinosaurs is paperpieced and then shadow with copics. The stamp has one more dinosaur but sense he was freestanding and not as cute I didn’t use him.

The papers are from Kaiser craft and I added the doodling around all the edges to get some contrast and to get a more whimsical look. The paper with the balloons have glossy details and that’s why the doodling haven’t stuck to it. The diamonds-paper have and metal shine to the orange diamonds ( which looks black on the photo) which made it hard to photograph. I made the card with this weeks sketch form Sketch saturday.

 material

Stamp: The Greeting Farm – Happy DaySS-245-2013

Copic: B95, B93, B91, E13, E11, E21, E51, C8, C6, C4, YR18, YR14, YR02, Y19, Y15, Y21, E37, E35, E33, YR23, Y21, C2, B000, B0000, 0

Paper: Kaiser Craft – Party Animals

Dies: Spellbinders – Nestabilities, Pinking Circle, Circle. Spellbinders – Edgeabilities – Classic Rick Rack. My Favorite Things – By the numbers.

Challenges

Träffar: 260

Teal birthday mice

 2013-02-02, 1

So today is my mothers birthday so I have been making a card during the week. Sense she also loves House Mouse I did one with a teal/turquoise feeling to it.

After it’s finished I have to admit it’s probably more my taste with the dark contrasts but I think she will like it anyway. The photo is a bit off, my camera-battery was out so it’s taken with my Iphone.

All the edges of the paper and of the image have been distressed with Evergreen Bough. The cupcake-paper have been paperpieced with the same teal paper as I use in the background, but it looks a lot darker due to all the shading I did on it. All the papers are from Basic Gray’s Hello Luscious collection.  The image have been colored with Copics but I forgot to write them down but The mice is cool gray and warm gray, the frosting is E40-E43 and the skin is my usual mice combination of E13, E11 and E51 (or 21).

As embellishments i have used the Jumbo snowflake from My Favorite things. I have been 2013-02-02, 2dying to use it (got it as a Christmasgift) and I just love the look of it. The tull-looking layer is something I got from my friend Marie. It was in an kind of beige colors and looked an awful like stockings. I colored it with some black ink and I like how it turned out but if you touch it it will give of color, which explain all the smudges all over the card. The sentiment is written in my handwriting and I bothers me a lot but it’s handmade and my mom have to love all I do (fortunate for me).

The inside follow the outside a bit but is keep very clean due to the fact that I’ll have to write inside what her birthday gift is.

material

Paper: Basic Gray – Hello Luscious

Stamp: House Mouse – Birthdays – Ice Cream – Birthday Cupcake

Dies: Spellbinders – Nestabilities – Square, Scalloped Square. My Favorite Things – Jumbo Snowflake, First place award ribbon.

Challenges

Träffar: 367

Baby Blue Little Lorry Bear

This weekend we will celebrate Oskar’s first birthday. Gosh the time flies by but it’s gonna be fun to see everyone again and see Oskar blow his candle for the first time.

A few weeks ago i found this darling papers from Doodlebug and I just loved it (especially the owl-pattern that I didn’t use here). So I wanted to do a really traditional baby-boy-card so I just dug out all the baby-blue things i had, lots of glitter and stars.

The image is from Lili of the Valley and I love how the bear turned out! It makes me happy to look at him. I did place the “1” on the car to symbolize Oskar’s first birthday. The “1” is cut in the same blue cardstock as the rest of the card but I colored it with some E43 to dull it down to fit the rest of the image.

The card have been decorated a bit with yellow stickles on some of the yellow dots on the background-paper and the ballon have been coated with some stardust. The ribbon is a regular baby blue satin ribbon that I embellished a bit with a blue button and some green embroidery-thread. The ribbon is not glued down all around and on this photo it have slided down a bit, I didn’t notice when I took the photo and don’t wanna take a new one.

Stamp: Lili of the Valley -Little Lorry Bear.

Paper: Doodlebug Design – Snips and Snails

Copic: E50, E53, E57, E59, E43, E41, E40, Y17, Y15, C4, C2, C0, YG25, YG08, YG23, C8, C6, C4, N3, E43, 0

Dies: Spellbinders – Nestabilities – scalloped rectangle, rectangle. Provocraft – Baby Face Alphabet. My Favorite Things – Stacking Stars.

Other: Distress Ink – Tumbled Glass. Stickles – yellow, stardust.

Träffar: 1053

Sentiment as a focal point

Welcome to another week on Sweet Stampin’. This weeks challenge is “Use Sentiment as a focal point“.

I don’t own that many sentiments that are long enough or lyrical enough to use as a focal, in my liking. But I do own this one from Tim Holtz and I really like it and use it far to rarely. I wanted to play some with my new papers from Echo Park so I ended up with a masculine card.

I got the layout from last weeks Mojo Monday Sketch. I haven’t done a Mojo Sketch for a long time and I had forgot how much I enjoyed them. The red of the papers are bit bit more dull and rust-colored in real life.

The black banner is a bit raised due to the fact that i curled it up a bit with a pen. The stars dimensional. I first adhered the paper to a piece of black foam i had and then cut it out with MFT’s Stacking Stars. I just love how it turned out, I have to to this more often, I think I’ll try some letter next.I did doodle around the edge of the sentiment, it looked far to empty.

The inside is made with the same thought and material. The only exception is that the brads are different,I ran out off the smaller ones like on the front. I also forgot that dimensional stars might not have been the best idea for an inside but it closed good enough.

Stamp: Tim Holtz – Urban Chic

Paper: Echo Park -Note to self

Dies: Spellbinders – Nestabilities – Circle, Pinking Circle. My Favorite Things – Stacking Stars. Nellie Snellen – Lace Edge Border.


Träffar: 235