Kategori: Sömnad

Meps igen

Som jag sa tidigare så gjorde jag en till meps men från det mindre mönstret (1-2år) men den var för liten för pojken. Jag funderade på att lägga ut den lite men råkade prova den på lilltjejen, istället som är 9 månader, och på henne passade den jättebra så den får vara kvar som den är. Jag får helt enkelt göra en ny till pojken.

Här är tjejerna tillsammans i sina mepsar.

Här kan ni hitta den första som jag sydde.

Träffar: 71

Meps

Jag har länge velat sy en meps men det har alltid fått prioriteras ner pga tid och energi. Men då har jag också tänkt att göra ett eget mönster men det tanken gav jag upp nu för att faktiskt kunna göra en.

Jag köpte mönstret från Pysselnabons etsy-sida (här är deras tutorial) och åkte sedan med stora tjejen till Stoff och stil för att köpa lite tyg. Min tanke är att köpa ett fint tyg till henne och ett med babblarna till pojken senare men nu ville jag testa mönstret och min sykunskap så jag valde nåt billigt men som båda skulle gilla. Flickan valde ett rosa med stjärnor så vi köpte ett likadant tyg i blått till pojken.

Jag skrev ut mönstret och klippte till bitarna. Mönstret var lätt att förstå och det mesta kändes väldigt rättframt. Det ena jag har ett litet huvudbry med var mellanlägget och vilken sidan som var klistrig men logiken sa den glansiga och det stämde. Jag tyckte att det enda stället som var lite pilligt var att sy runt utsidan på skärmen eftersom att det sysns så tydligt när man vänt den, nästan alla sömmar gömmer sig själv i slutändan. Så om någon vill göra en är mitt tips att alltid hålla sig ca 2 mm utanför själva mellanlägget och vara noggrann där.

Jag valde mönstret för 3-7 år till min 4åring och det passar bra, lite stort men sitter tillräckligt bra. Modellen är ganska säckig i bak och jag har inte riktigt bestämt mig för om jag gillar det eller inte, jag inbillar mig att hon får svårare att sätta på mössan rätt på egen hand.

Jag provade att sy den 1-2 år till sonen (3 år), eftersom storasysters mössa blev lite för stor för honom, men den var för liten. Nu får jag se om jag gör en till större eller om jag sätter in en kil i hans eftersom det ändå bara är en prototyp.

Jag är i alla fall nöjd med flickans mössa och den kommer att vara väldigt bra nu när det är så kallt och soligt!

Träffar: 185

Barntäcke av ett vuxentäcke

Eftersom vi nu har tre ungar och det behövs minst 2 par sängkläder för varje barn, om det sker olyckor, så börjar det bli dyrt att köpa sängkläder i spjälsängsstorlek när de kostar i stort sett lika mycket som sängkläder i fullstorlek, och speciellt eftersom jag sällan vill ha örngottet som hör till spjälsäng då de är för små för mina två större barn.

Så jag har funderat på om det skulle gå att göra om ett vuxentäcke till två mindre täcken, och nu har jag äntligen gjort det. Jag köpte ett billigt täcke på Ikea och tog ett av våra gamla slitna påslakan för att experimentera med.

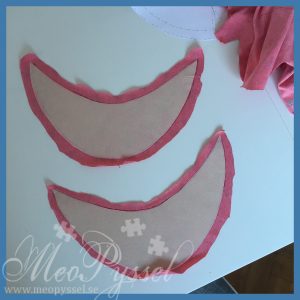
Jag började med att marka ut mitten på täcket och pålakanet på långsidorna. Påslakandet klippte jag bara rakt av men täckte krävde lite mer hantering eftersom det innehåller vaddering. Jag började med att sy en vanlig, ganska tät raksöm vid mittmarkeringen och sedan vid sidan om den. På det sättet skapade jag barriärer kring en kanal, barriärerna håller undan vaddet medan jag delar täcket i två.

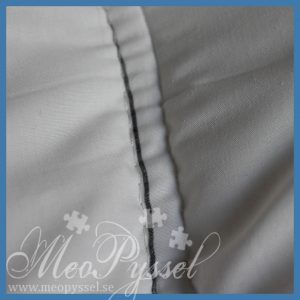
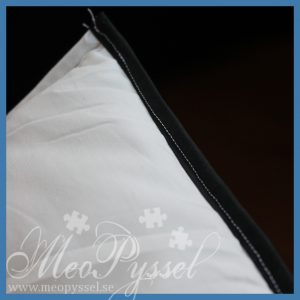
Efter det sicksackade jag kanterna och sydde på ett kantband. Jag hade svart hemma så jag valde det eftersom det ändå inte kommer att synas i efterhand. Kantbandet gör att kanten blir ganska hård men jag tyckte inte att det var så farligt.

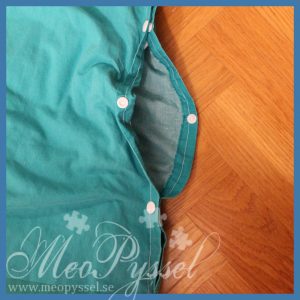
Sedan sydde jag ihop påslakanet. Jag började men den “lätta halvan” jag jag snyggande till kanterna och sedan satte i tryckknappar, nackdelen med att göra det lätt för sig själv och inte syihop orginalöppningen är att öppningen hamnar på långsidan men eftersom att det bara var ett experiment nöjde jag mig med det.

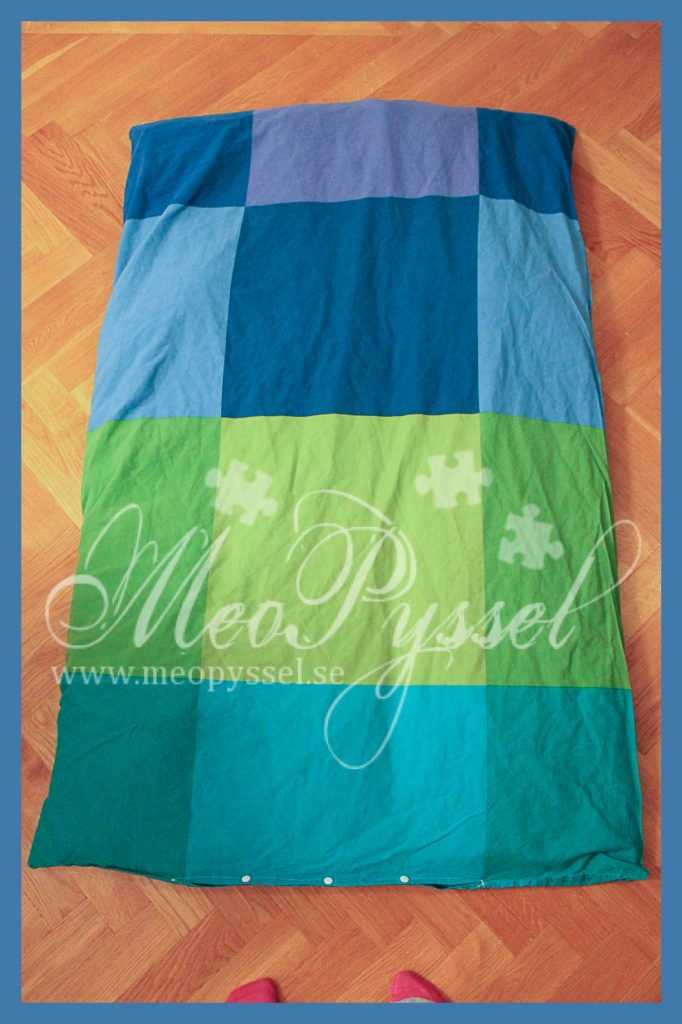
Det tog inte så lång tid att göra och med lite extra tid kan man nog få det riktigt snyggt. Formen på täckena blev lite annorlunda, proportionerna stämmer inte riktigt med vad man är van med, det är lite smalare. Genom att dela påslakanet och sy igen det blev det lite trångt för täcket, men det får definitivt plats.

Eftersom formen blev lite smal fungerade de nya täckena inte riktigt så bra som jag hade hoppats så jag kommer inte nog inte att göra fler utan får nog ta att köpa “riktiga” istället. Dom här är dock riktigt bra som en backup vid exempelvis magsjuka eller andra olyckor.

Träffar: 130

Yet another bib

2014-06

Here comes a bib I made from a owl-oilcloth that I just love, and it’s the cloth that on our table right now. I bought 1/2 meter extra just so I could make some bibs from it.

This one is made to be gender-neutral so I avoided the use any of the purple, pink  and blue birdies.


(See the first post for the pattern)

Träffar: 58

Another Bib

2014-05-05

So I made another bib, or actually I did a lot more but I only made one new color-combination. I haven’t bought any new fabric so there ain’t to many combination to be done.

I have avoided to made one that is mostly white, or that have white trimmings so they won’t look dirty to quickly. The green and the pink fabric really don’t go well together so thats´’s another combination that’s out.

Träffar: 78

A baby-sun-hat

2014-04-21, 2This easter have just been so wonderful. The weather have been warm and sunny all day so we have been out having lots of fun. A walk in the park, barbecue and just a couple of walks. Unfortunately we wasn’t really prepared baby-wise. We soon realized that Freja only have winter-hats. Due to all shops being closed for easter I started to Google pattern for sun-hats. I found this tutorial and pattern from Bethany.

2014-04-20It was really easy to follow (I didn’t cut and sew the straps, instead I breaded some yarn. I think that a strap that you can tie is better so it can be adjusted for size and occasion) and the hat is just so cute… but to small for my daughter. The hat I made from Bathany’s pattern is approximately 38cm in diameter (my daughter has 43).

After another search I found someone saying that the hat-part should have the length of 1/3 of the diameter you want. So I copied the pattern from Bathany and resized it in Word. My base is now 14cm instead of 11cm, and my bring has an inner diameter of 17 cm (calculated after the hat-part was done s that the brim would be the exact length I needed. This one is slightly to big for my daughter, but in the good way. She can probably have it for a month or two and it’s still good for now. On the second one I then attached a ribbon to ad some interest. On the picture below you can see the difference in size.

2014-04-21, 1

Träffar: 54

Handmade Bibs

IMG_4833Freja is now old enough to get some food, but that also means she is old enough to get food all over. We bought a babybjörn-bib but it’s to firm and she is to short so it gets uncomfortable for her, so I have been looking around for some soft bibs and didn’t find any. Or at least not any for a price I’m willing to pay. Then I decided to see if I could find some patterns online and make my own. I found a couple of ones but I really liked the one from Linda at Craftaholic anonymous, and I have used her Infant one for all the three bibs here (The infant and the toddler pattern is the same around the neckline and just differ on the length).

IMG_4760I started out with doing the green one and for that one I followed that pattern. The green is vaxed fabric and the black is regular cotton liner. The neckline is a perfect fit for my daughter so I fear that it will be to small soon so for the next one I altered the neckline. I really do like the pattern, the shape and length is perfect and I like that the pattern isn’t handmade. It’s easy to trace and is symmetrical. The green bib have been used and cleaned before this picture and are therefore a bit wrinkly, which doesn’t bother me (same with the pink and white one).

IMG_4839For the next one I altered the neckline by just drawing a straight line from the inside of the neckline and up to the edge. I also made the pocket a bit wider so it would stand out more then one the green one, but after using the green one the pocket stands out enough so I won’t do that alteration on the future ones. One this one I was in a hurry when it sewed the lining so it’s folded on some places (sorry for that). I really like the color-combination of this one and I look forward to made more bibs in different colors. I intend to decorate the pocket on future ones but I haven’t found a way to stitch on letters and shape which gets nice enough, yet. This one is also made with vaxed fabric and cotton liner.

IMG_4843The last one I made is from oil-cloth (a piece of a tablecloth) which is a bit stiffer then the vaxed fabric (Freja can use it but I think it needs to be used more to soften the fabric some, now it looks a bit uncomfortable but still usable). I just love the mushrooms! One this one I also altered the neck but i keep the pocket as the pattern made it.

Now when I have made some and got a hang of it a bib takes about half an hour to make from start to end. So it’s easy and fast. I really recommend it for those with infants (much cheaper also). Example: The muchroom-bib roughly costed 4 Euro (for liner and fabric) and then I have fabric left for probably two more bibs. I will make lots of more (have lots of fabric left) and I intend to leave some behind at Freja’s Grandmothers, aunts and so on so I don’t need to bring it with me all the time. I also plan to make some as gifts but that is probably something for later.

And here comes a picture of Freja eating and smearing bana-pure all over in her pretty bib.
IMG_4786

Träffar: 106

Owl-mobile: finished

2014-01-19So the Owl-mobile is finally done. When I started off I imagine that it would be 5 owls but after some measuring I realized that with this size there is only room for 3. So this is the ones I made.

On the Pink one i stitched the wings and feet before putting the two halves together but I really didn’t like how it looked and how it felt when I needed to stitch the halves together so on the black one I did wings and feet last.

I made hooks of some old paper-clips but I’ll see what I can find for solution later on.

You can see the Pattern I used here.

Träffar: 66

Owl-mobile: the frist owl done

So a couple weeks before our little Freja arrived I started to make some felt-owls for an owlmobile. I didn’t get very far, due to the total lack of inspiration during my pregnancy but yesterday I finished the first one and more is on the way.

2013-12-13 1

2013-12-13 2

My Owl don’t have any tailfeathers yet but I might add it on later. I made the body first and then sewed together the top of the body, put the breaded hanger in between the bodyhalfs and then sewed up the bottom. After that I remember that feet and wings would be good so I put them on later. I thought I would do wings and feet before sewing it together on the next owl but now when I’m doing the next one I realized that you could and should do that with the feet but if you attach the wings before sewing the halfs together it will be hard to stitch the halfs together nicely so I would recommend to do the wings last.

My hanger is just two strands of black and one strand of white yarn that I breaded together. I made the hanger longer then the Carrier so I have some space to play with but also so I can fasten I on the Carrier later. The pupils are just drawn on with a permanent marker but I might sew something on later, the permanent marker was a nice solution when I didn’t find my black felt (that I later found under the sofa).


I’m using this pattern which I have found on a couple of different sites but I haven’t really found a creator, I found it on this site. I have shrunk the pattern down a bit (don’t remember by how many percent) so that I could fit a couple of ones hanging on our babycarrier. I used this stitches for the outline and just some regular ones to stitch the parts. For the stuffing I used the filling from an old Ikea-pillow.
bf1d888580ccd5c8f32f171a9d37db3a

So hopefully the finished mobile will be up soon:)

Träffar: 114

Babynest

So our little girl came to the world a bit earlier then expected and is now 3 weeks old (time flies). The good thing is that my crafting-inspiration is back.The bad thing is that time flies and most of my days still goes to looking at our little princess.

So the truth is that I haven’t made a crafty thing yet (even if I have lots of plans) but the good news is that my dear sister is on a visit and she made me and Freja a babynest. The babynest turned out great! She found the cutest fabric for me (I just love owls) and Freja have been sleeping nicely in it last night and all day today. And the best thing is that it fits the cradle perfectly so now we don’t need to stuff the sides and bottom with miscellaneous things.

The pattern is mostly taken from this site, but with some changes, plan and unplanned.


The next step is to sew some handles, but that will be for another day:)

2013-12-04 3
Aunt Jenny in the process
2013-12-04
The finished babynest
2013-12-04 2
The use of Freja’s babynest:) Allowing mum and dad to cook dinner together in the kitchen

Träffar: 47